RDP ToPrefixArea
This page is intended to share the steps necessary to create a simple RDi 9.0 plug-in. This plug-in is a User Action - it can be assigned to a key combination and used within the editor to jump the cursor between the text area and the prefix area.
Contents
[hide]Switch to the Plug-in Development perspective
- Window > Open Perspective > Other... Plug-in Development
- Make sure you have the Package Explorer view available
Create a new plug-in project
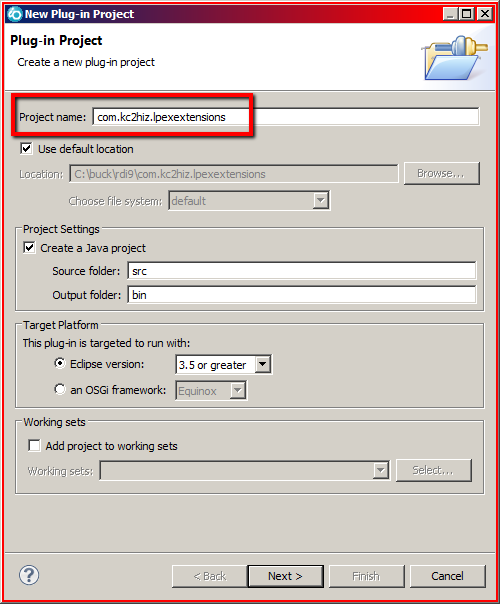
- File > New > Plug-in Project
- Fill in the name of the project. This will become the name of the generated .jar file. Case is very important!
- Click Next.
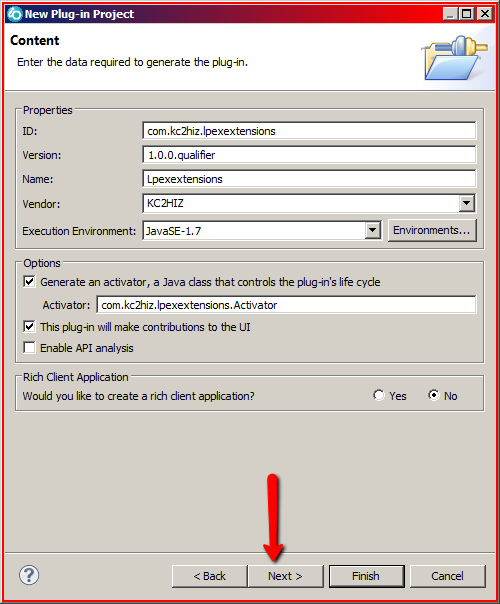
- The next panel describes some of the details of the project. The defaults look good.
- Click Next.
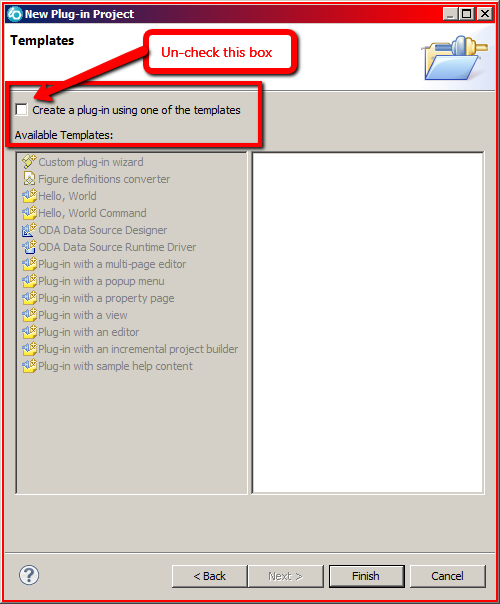
- The next panel is asking if you want to use a template. Don't use a template.
- Click Finish.
Set the plug-in properties
Overview
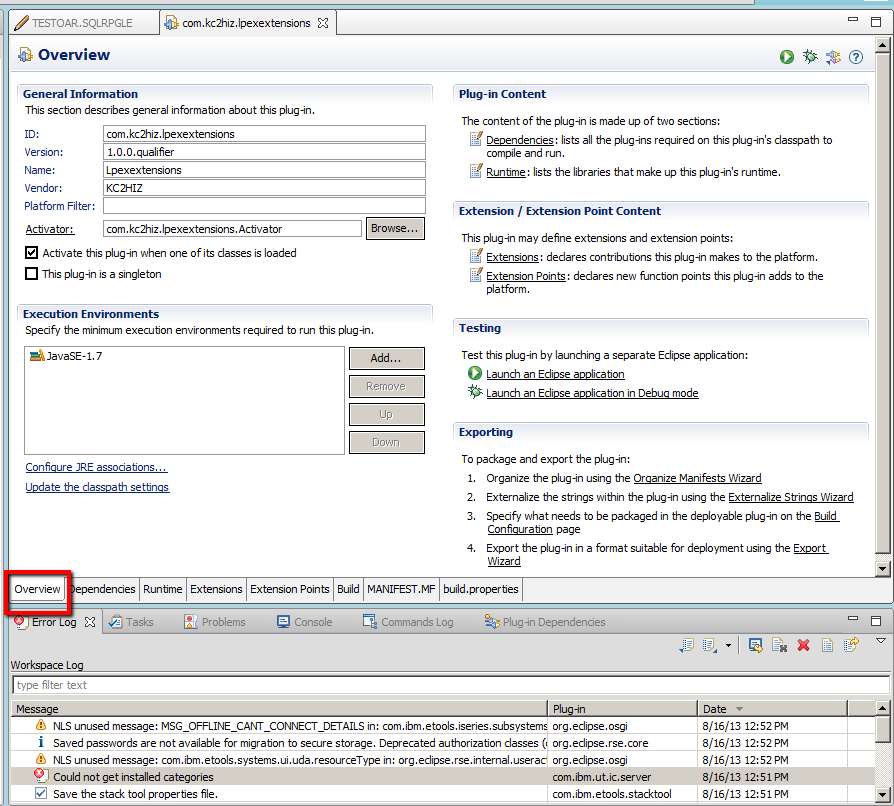
- Look at the editor view on the right. There is a new tab there with your project on it. Click on the Overview tab.
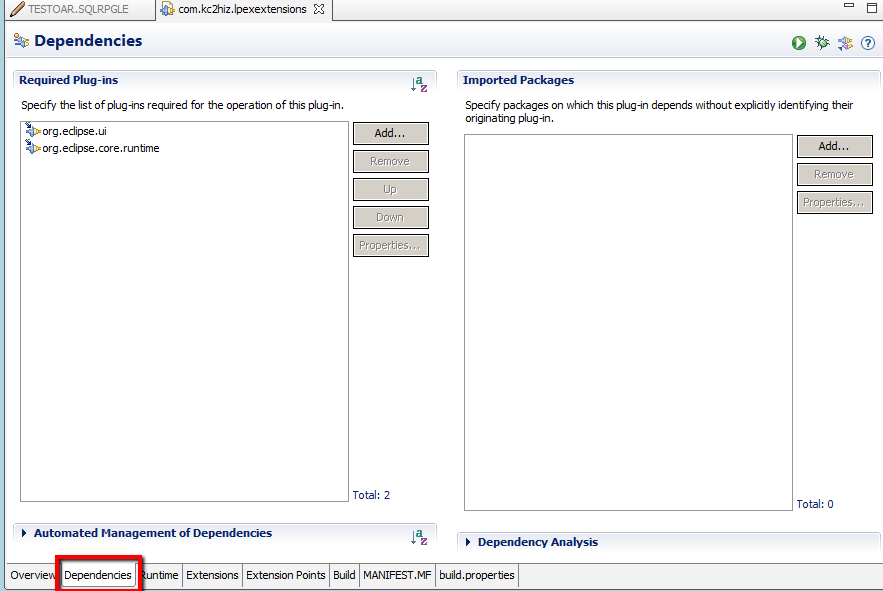
- The defaults look OK. Click on the Dependencies tab.
- Click the Add... button to add a required plug-in.
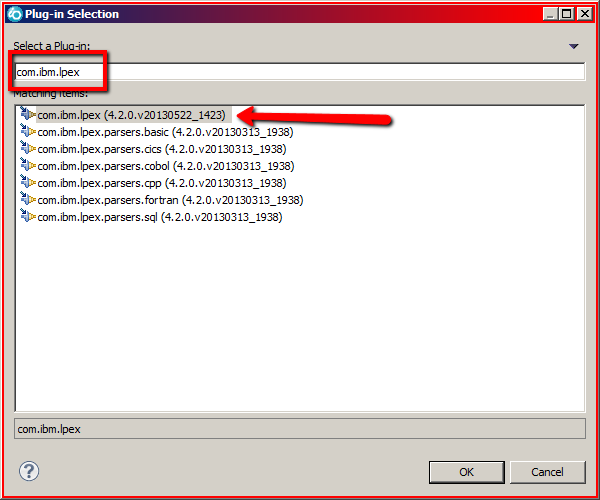
- Filter on com.ibm.lpex
- Click on com.ibm.lpex
- Click OK.
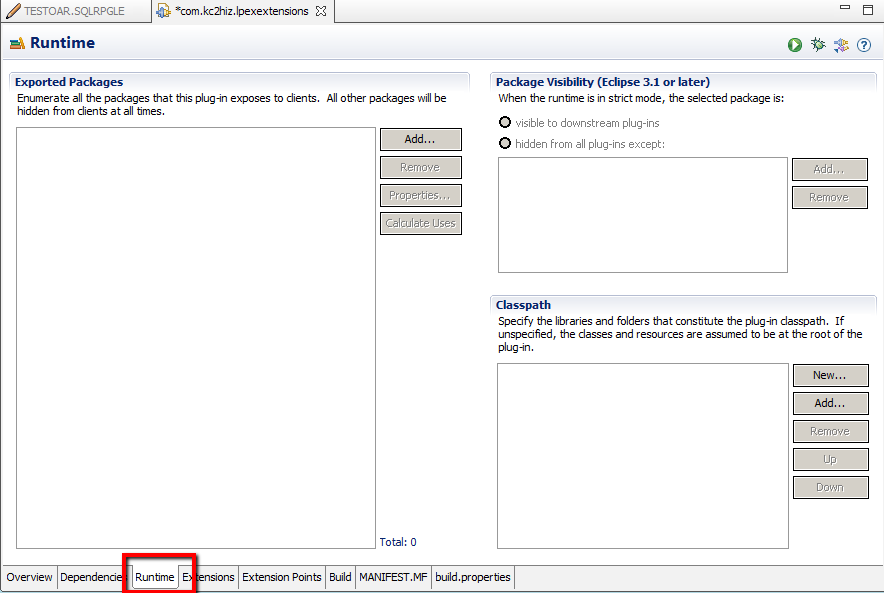
- Click on the Runtime tab
Runtime
This is the Runtime tab. We need to tell Eclipse that our soon to be completed plug-in is available for public use.
- Under Exported Packages, click Add...
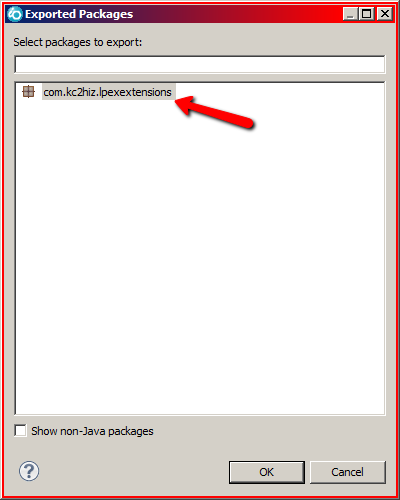
- Select the class we're working on (here, com.kc2hiz.lpexextensions) and click OK.
- Press Ctrl-S to save
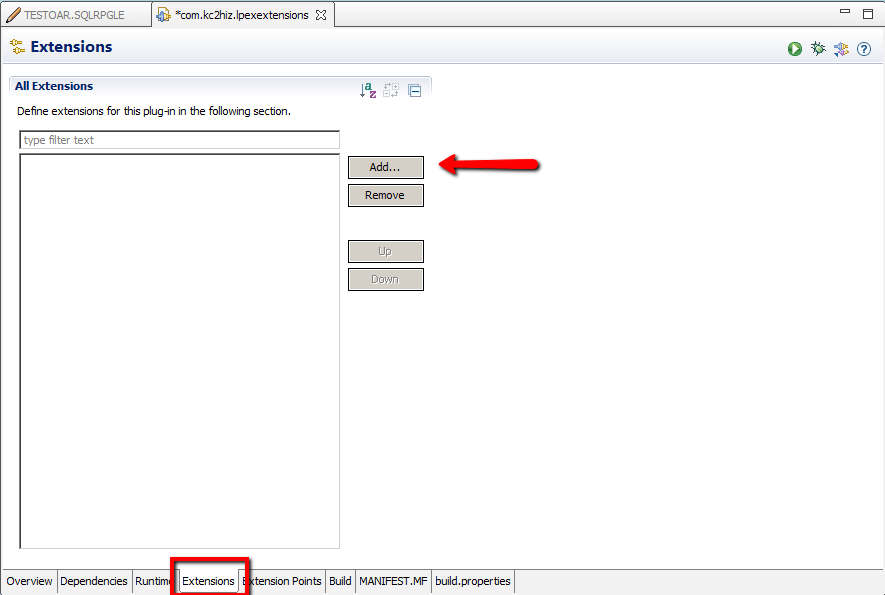
- Click the Extensions tab
Extensions
Here we tell Eclipse about any extensions this plug-in will need. We're extending lpex.preload (for the Activator).
- Click Add...
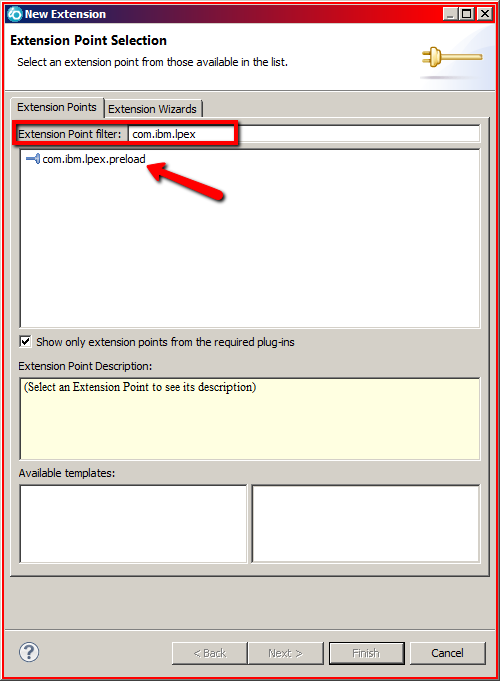
- Filter on com.ibm.lpex
- Select com.ibm.lpex.preload
- Click Finish
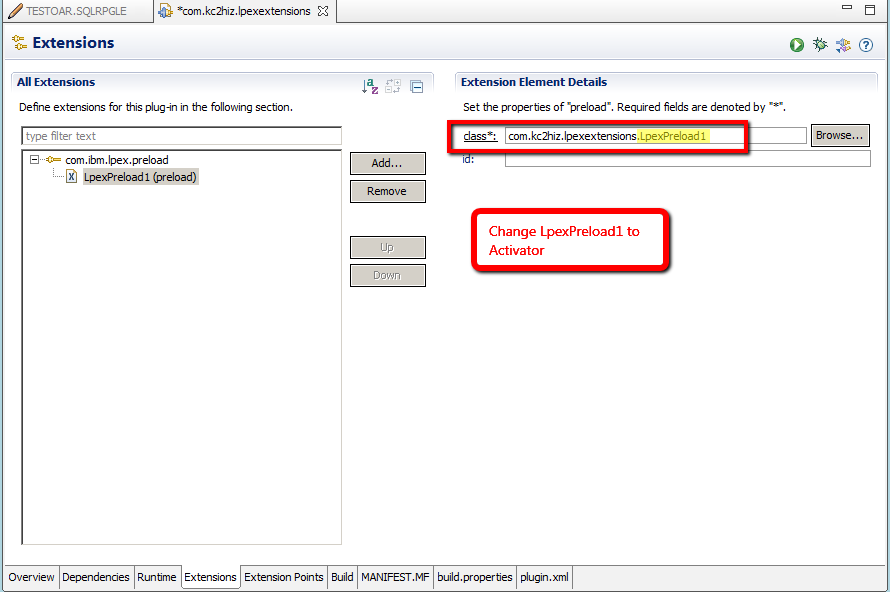
- The wizard generated a name for the extension that we don't want.
- Click Browse...
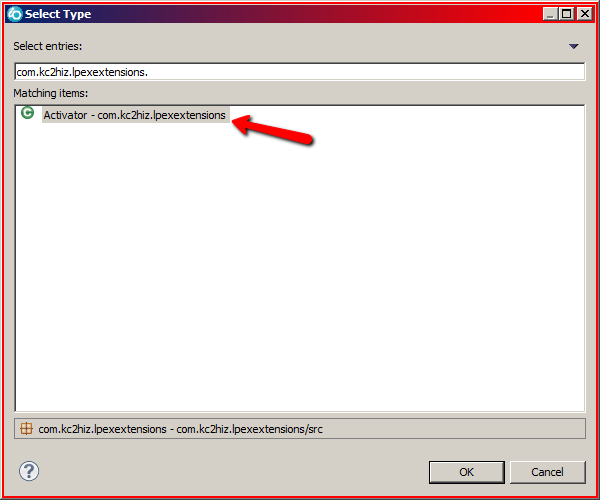
- On the Browse window, select Activator - com.kc2hiz.lpexextensions
- Click OK
- Ctrl-S to save
Add a class file
Now that the shell of the plug-in is prepared, it's time to drop in the code that will actually do the work we're after.
- Look at the Package Explorer view
- Find your new plug-in (Here, com.kc2hiz.lpexextensions)
- Find the src folder
- Inside the src folder, find the package com.kc2hiz.lpexextensions
- Right click that
- Select New > Class...
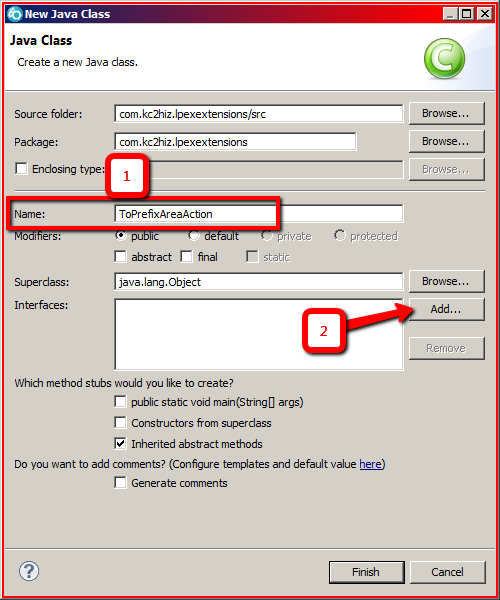
- Name the action. Here, it's ToPrefixAreaAction
- This Action is extending an existing Interface, so we need to tell Eclipse what Interface that is. Click Add... under Interfaces.
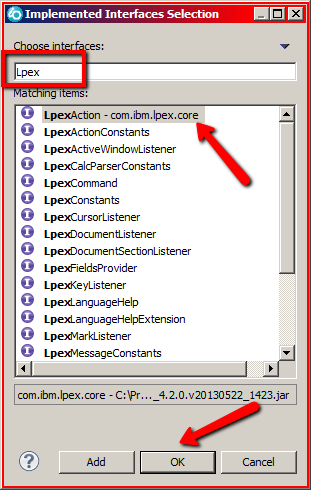
- Filter on Lpex
- Choose LpexAction - com.ibm.lpex.core
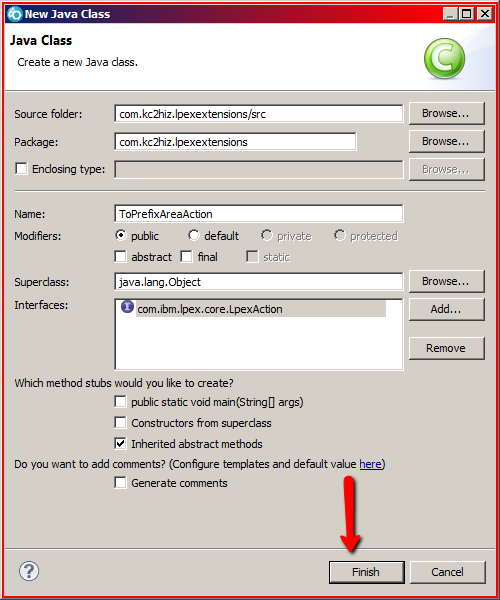
- Click OK
When you click Finish, the wizard will generate a new Java source file based on the settings made here.
Edit the class that does the work
Finally, we're at the part where we're writing some code. Basically, everything we need to do for this action can be handled in the doAction() method, but we're also going to put code in the avaioable() method to report back when we can use this plug-in.
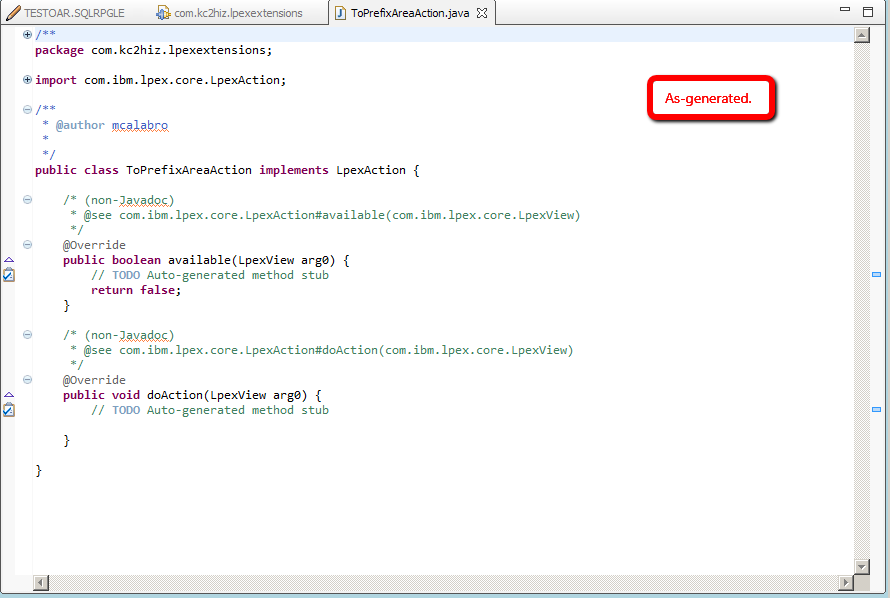
- Java editor opens with generated source
- As generated by the wizard
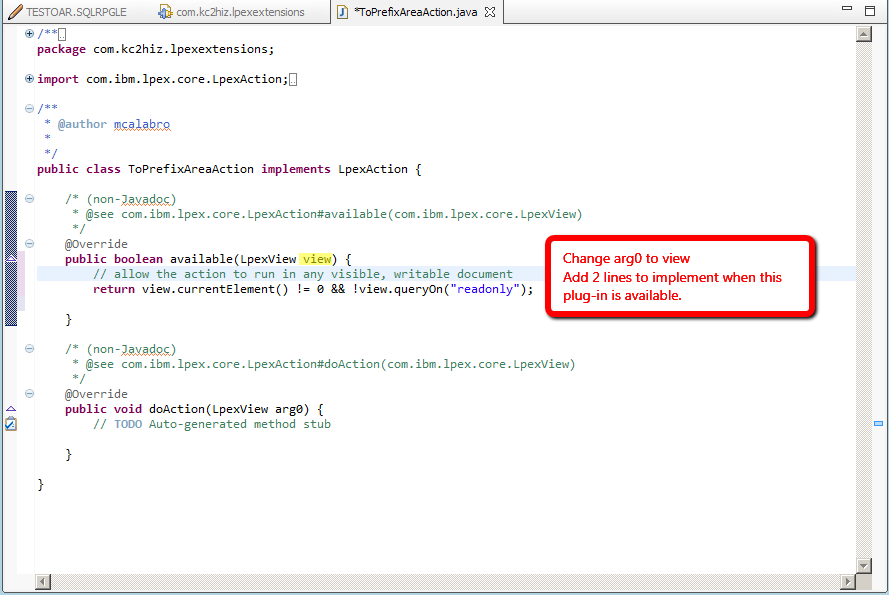
- Edit available()
- Change arg0 to view
- If the current element (editing window) is present AND is writable, return 'true'
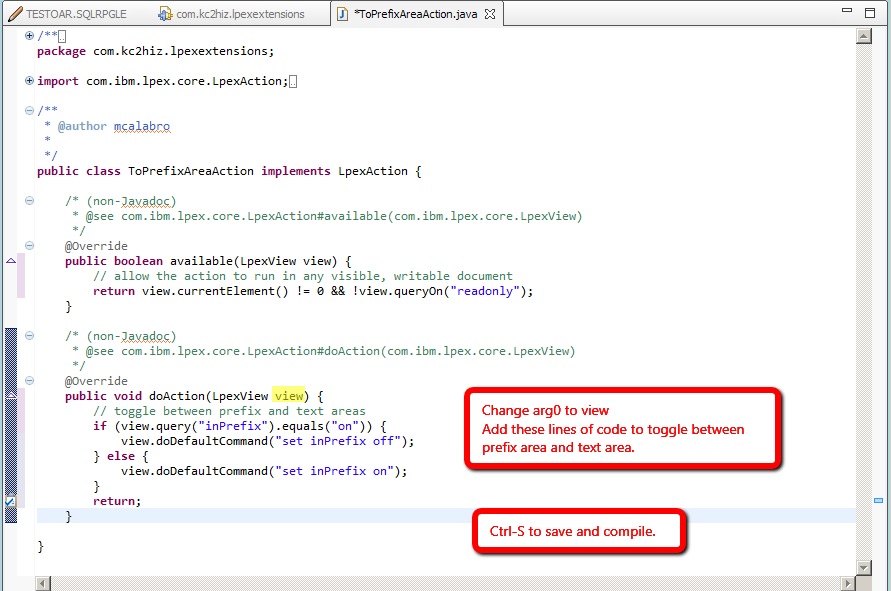
- Add doAction() code
- Change arg0 to view
- Add code that tests if we're already in the prefix area or not. If so, move to the text area. If not, move to the prefix area.
- Ctrl-S to save
Edit Activator.java
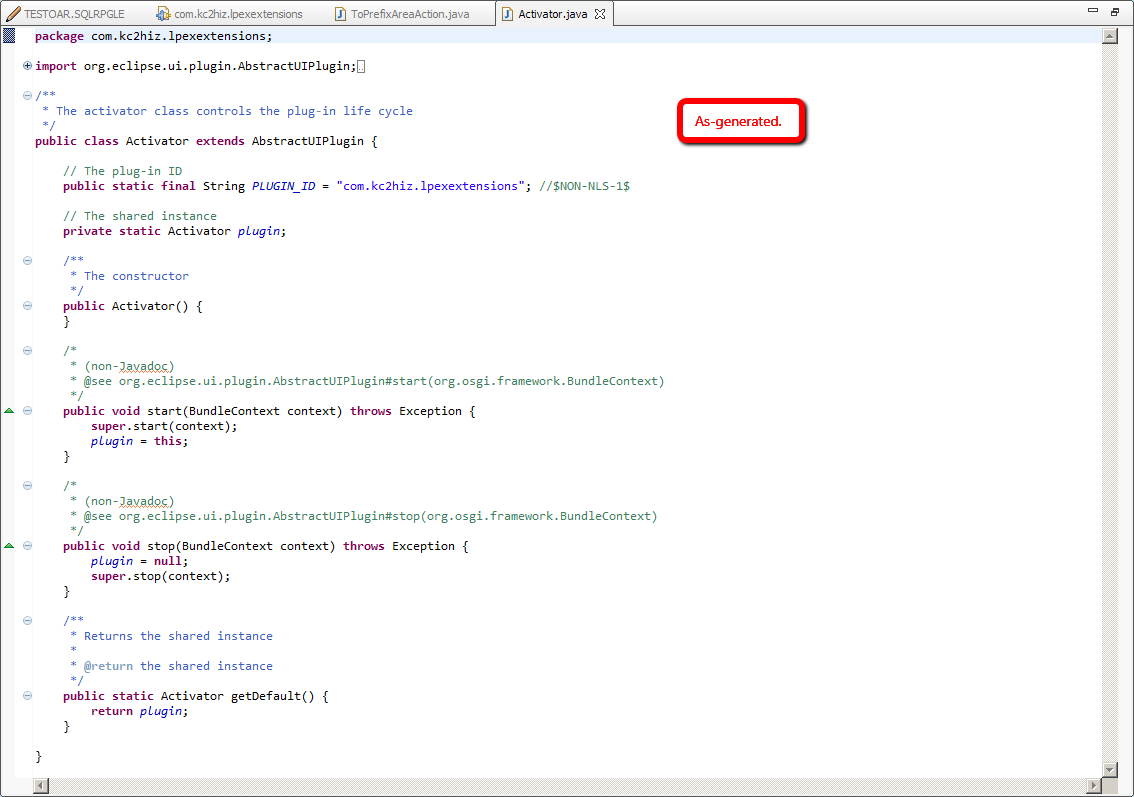
This class tells Eclipse what work to do when the plug-in is started or stopped.
As generated by the wizard.
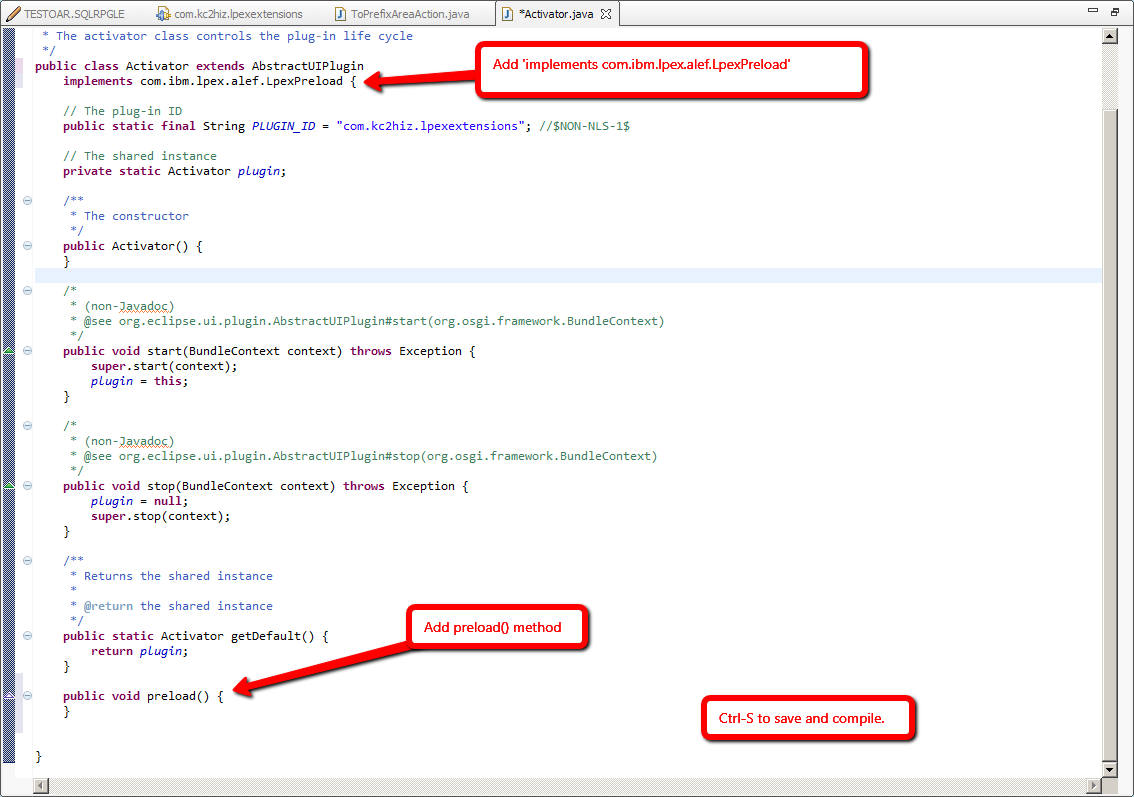
- Edit Activator
- Extends com.ibm.lpex.alef.LpexPreload
- Add empty public void preload() method
- Ctrl-S to save and compile
Export the plug-in
At this point, all of the code is written. Yes, those two little Java files make up the plug-in. Well, them and the MANIFEST.MF and plugin.xml. And build.properties helps with the process of keeping all the pieces aligned in the IDE. The export process packages up all the necessary .class files and other anciliaries into a single .jar file which then can be deployed into any RDi configuration and used after a restart.
Export wizard
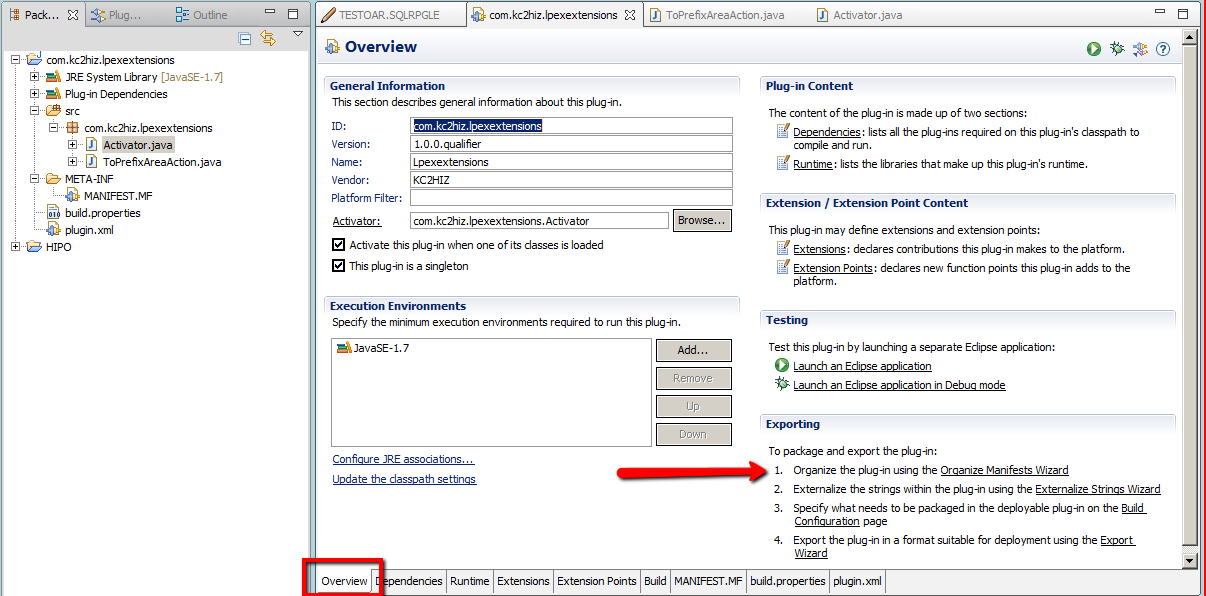
- Click on the Overview tab
- Click on the Organize Manifests Wizard link
- Click Finish
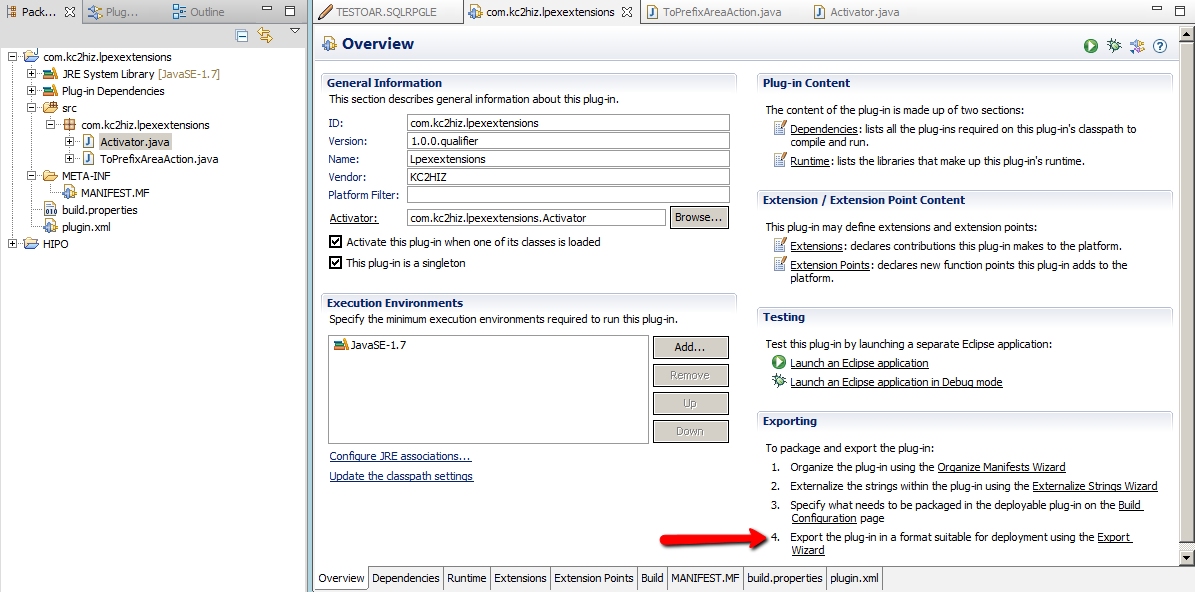
- Click on the Export Wizard link
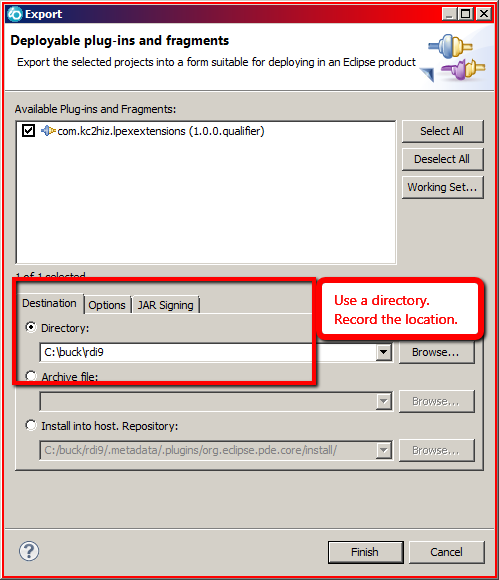
- It's important to export as a directory. Record the export location; you'll need it to deploy the plug-in.
- Click Finish
- Close RDi
Copy jar file
- Open Windows Explorer
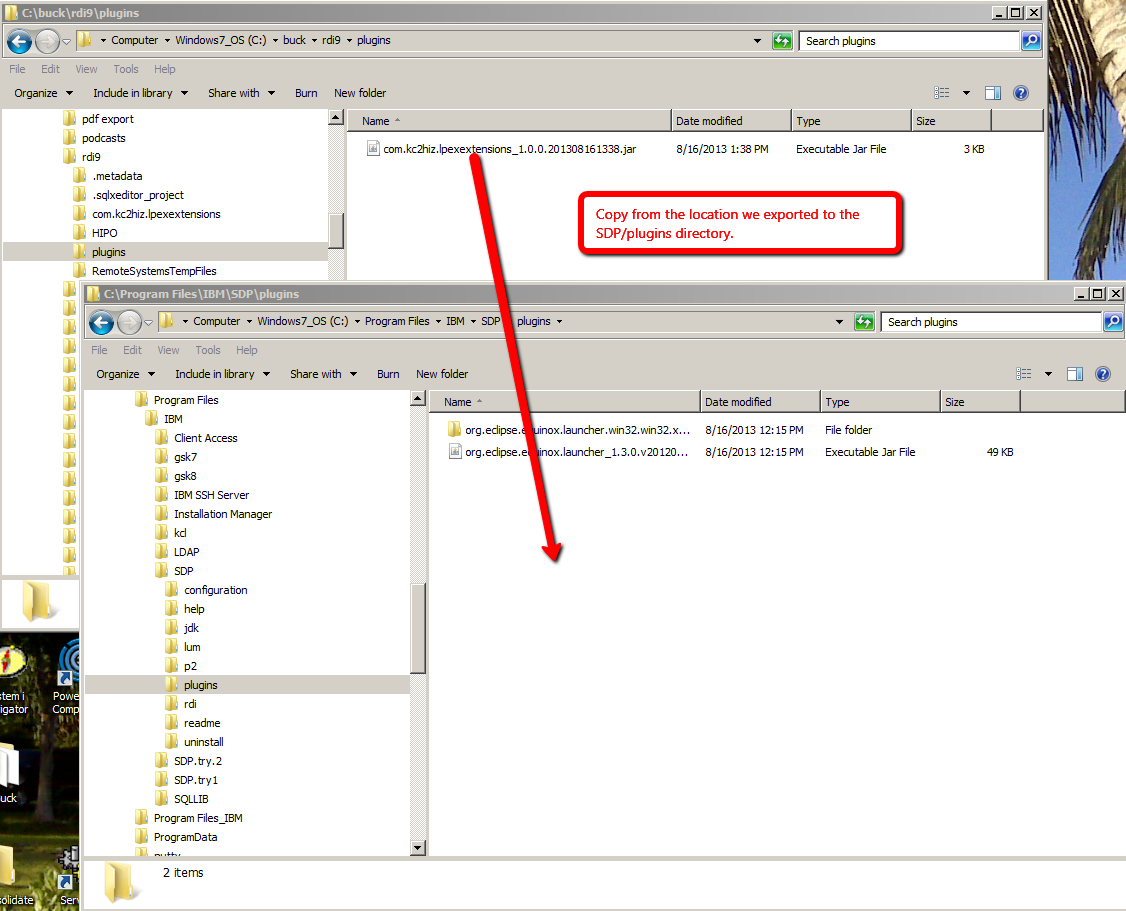
- Position to the directory you recorded above. Here, it's c:\buck\rdi9
- Open the plugins folder
- Open a second Windows Explorer
- Position to the directory where you installed RDi. Here, it's c:\Program Files\IBM\SDP
- Open the plugins folder
- Copy the .jar file from the export directory into the SDP\plugins folder.
- RDi 9.6 and up: Copy the .jar file from the export directory to the program files\ibm\dropins folder. You may need to create the dropins folder.
Set up RDi to use the new plug-in
- Start RDi. If you've been tinkering with this plug-in, you might want to use the -clean parameter. I keep a separate icon with that option. We're now going to tell RDi about our new plug-in and assign it to a keystroke.
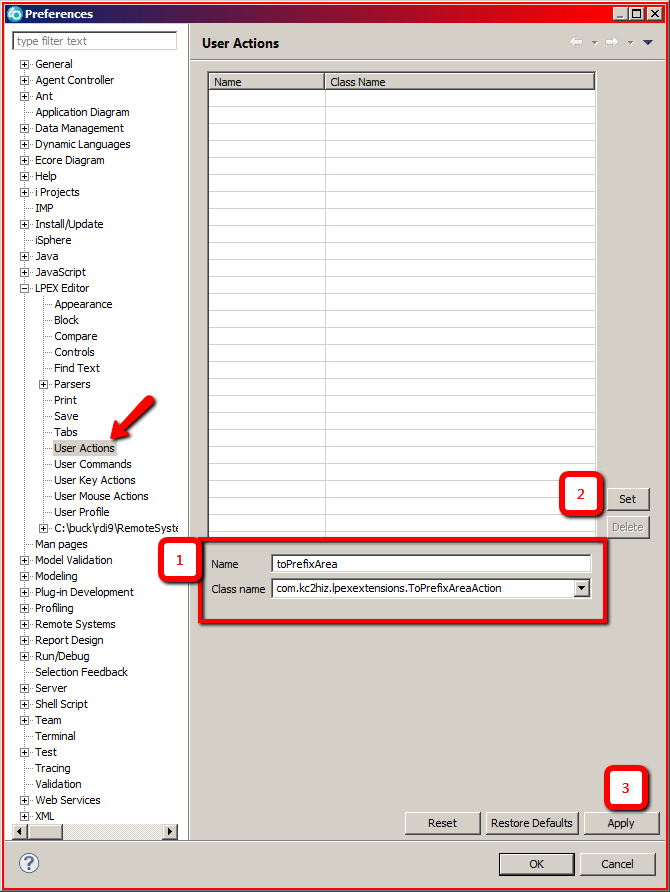
User Actions
First, tell RDi that we have a new user action available.
- Windows > Preferences
- LPEX Editor
- User Actions
- Give the action a name. I find it simplest to name it the same as the Java class.
- Identify the class that implements this action. Here, it's com.kc2hiz.lpexextensiotn.ToPrefixAreaAction
- Click Set
- Click Apply
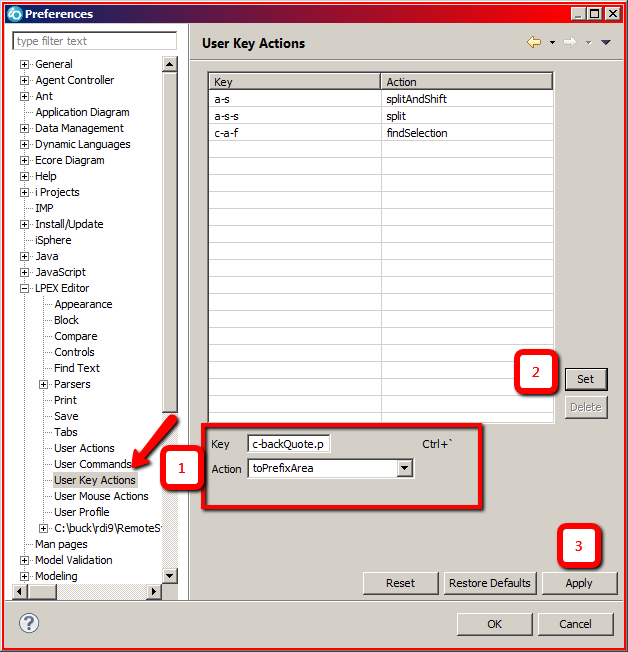
User Key Actions
Finally, assign the user action to a keystroke. I chose Ctrl + ` (the back-tick, below Escape and above Tab).
- Windows > Preferences
- LPEX Editor
- User Key Actions
- Give the action a name. I find it simplest to name it the same as the Java class.
- Identify the class that implements this action. Here, it's com.kc2hiz.lpexextensiotn.ToPrefixAreaAction
- Click Set
- Click Apply
- Give the action a name. I find it simplest to name it the same as the Java class.
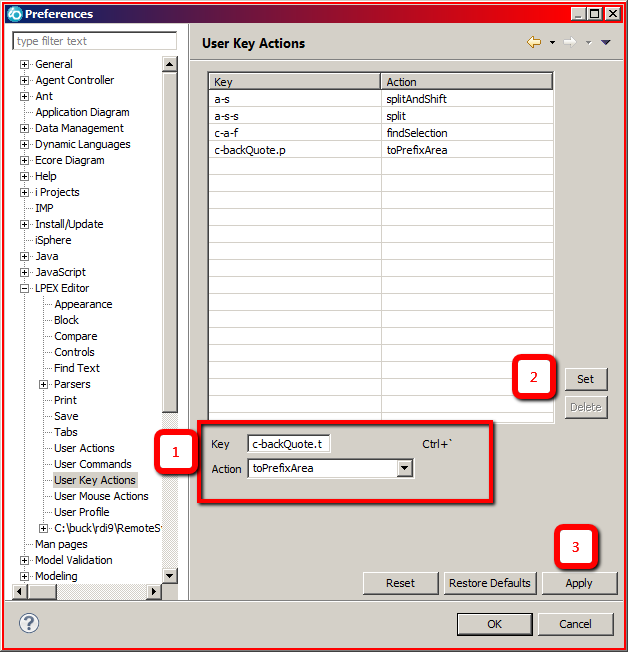
- Assign a key. Here, it's c-backQuote.p. The trailing .p tells Eclipse that we want to enable this keystroke in the prefix area
- Fill in the name of the action assigned above. Here, it's ToPrefixArea
- Click Set
- Click Apply
- Assign the same key, but this time with a trailing .t which tells Eclipse we want to enable this keystroke within the text area
- Fill in the name of the action assigned above. Here, it's ToPrefixArea
- Click Set
- Click Apply
- Click OK
Now test the new action by pressing Ctrl-` multiple times inside an IBM i source member. The cursor should move between the rprefix area (line numbers) and the text area( the editable source).
